Installation manual - BITMOTECO Platform in VM
Version 1.1.0 | EN | 08-2024
Overview
This is the Virtual Machine installation guide, designed to assist you in setting up a virtualized BITMOTECOsystem using various hypervisors. Whether you're a beginner or an experienced user, this manual will guide you through the process of creating and configuring a virtual machine for our platform across different hypervisors, including VMware, VirtualBox and Hyper-V.
The BITMOTECOsystem officially supports the following hypervisors:
- VMware vSphere / ESXi
- Microsoft Hyper-V
- Oracle VirtualBox
- Proxmox VE / QEMU
- Virtual Machine Manager / QEMU
Other hypervisors should also work, but have not been tested.
Installation guide for VMware vSphere / ESXi
Our support team will help you with the setup and installation of your virtual machine using VMware virtualisation technology. If you encounter any issues or prefer guided assistance, we are available to walk you through each step of the process.
To receive personalized support, please schedule a virtual meeting with our team at your convenience. During this session, we will work with you to ensure your virtual machine is configured correctly and ready to use.
To book a meeting, simply contact our support team, and we’ll arrange a time that works best for you. We look forward to assisting you!
Installation guide for Microsoft Hyper-V
Prerequisites
- A Windows machine with Hyper-V enabled. Ensure that your system supports Hyper-V and that it is enabled in the BIOS.
- The BITMOTECOsystem ISO image that you wish to install on the virtual machine stored on the same system
Setup steps
1) Open Hyper-V Manager
Press Windows + S and type "Hyper-V Manager" to search for the application.
Click on Hyper-V Manager to launch it.
2) Create a new virtual machine
In Hyper-V Manager, click on New in the Actions pane on the right.
Select Virtual Machine from the dropdown menu.
This will launch the New Virtual Machine Wizard.
3) Specify the name and location
Give your virtual machine a name in the Name field (for instance BITMOTECOsystem).
This name will be used to identify your VM within Hyper-V Manager.
Optionally, select the Store the virtual machine in a different location checkbox if you want to save the VM files to a location other than the default.
Click Next to proceed.
4) Specify the generation
On the Specify Generation page, select Generation 2 to enable EFI (Extensible Firmware Interface) support.
This generation supports features like Secure Boot and UEFI firmware, which are required for the BITMOTECOsystem.
Click Next to continue.
5) Assign memory
Specify the amount of memory (RAM) you want to allocate to the virtual machine.
Ensure you allocate enough memory for the operating system you plan to install.
The recommended minimal amount is 4096 megabytes.
Optionally, you can enable Dynamic Memory to allow Hyper-V to adjust the memory allocation as needed.
Click Next to proceed.
6) Configure networking
On the Configure Networking page, select a virtual switch from the dropdown menu. This will connect your VM to a network, allowing it to access the internet or communicate with other VMs.
The web-based user interface of the BITMOTECOsystem is also accessible via this network.
Click Next to continue.
7) Connect virtual hard disk drive
Choose Create a virtual hard disk and specify the name, location, and size of the virtual disk.
The recommended minimal amount is 32 gigabytes.
If you have an existing virtual hard disk, you can choose Use an existing virtual hard disk instead.
Click Next to proceed.
8) Install the BITMOTECO operating system
On the Installation Options page, select Install an operating system from a bootable image file.
Click Browse and select the ISO file for the operating system you want to install. The filename should be BitmotecoPlatform_X.X.X.iso, where X.X.X is the version number.
Click Next to continue.
9) Review and create the virtual machine
Review the settings you’ve configured on the Summary page.
If everything looks correct, click Finish to create the virtual machine.
10) Install the BITMOTECOsystem
In Hyper-V Manager, locate your new virtual machine in the list of VMs.
Right-click on the VM and select Connect.
In the Virtual Machine Connection window, click Start to power on the VM.
Follow the on-screen instructions to complete the installation of the BITMOTECOsystem.
11) Access the user interface
Wait for the installation to finish, write poweroff, press Enter to stop the VM.
Remove the installation ISO file from the virtual disk drive.
After starting and booting the VM you should see its IPv4 address on the virtual screen.
You can now open your Webbrowser and browse the machines IPv4 address in order to access the web-based user interface.
Installation guide for Oracle VirtualBox
In this guide, we will walk you through the steps required to create a virtual machine (VM) using Oracles VirtualBox. This guide was created using Oracle VirtualBox version 7.0.
Prerequisites
- CPU with enabled virtualization support
- VirtualBox installed on your system
- The BITMOTECOsystem ISO image that you wish to install on the virtual machine stored on the same system
Setup steps
-
Open VirtualBox on your system.
-
Click on the "New" button to create a new virtual machine.

- Create Virtual Machine window - Tab: "Name and operating system"

| Field | Value |
|---|---|
| Name | Enter a name for your virtual machine. For example BITMOTECOsystem. |
| Folder | Select a folder where the VM will be installed on your system. |
| ISO Image | Select an ISO image from your local filesystem: Example BitmotecoPlatform_X.X.X.iso, where X.X.X is the version number. |
| Type(Operating System type) | Linux |
| Version | Other Linux (64-bit) |
- Create Virtual Machine window - Tab: "Unattended Install"
-
This should be greyed out and no changes are required
-
Create Virtual Machine window - Tab: "Hardware"

Set the memory size and the amount of processors for your virtual machine, keeping in mind the recommended requirements for the operating system version. See the documentation of the individual OS Version. As a rule of thumb: The more base memory and CPUs available to the VM, the more powerful the BITMOTECOsystem will be.
- It is recommended to provide a minimum of 4096 MB Base Memory.
- It is recommended to provide a minimum of 2 CPUs.
-
Important: Enable EFI support
-
Create Virtual Machine window - Tab: "Hard Disk"
- Select "Create a Virtual Hard Disk Now".

| Field | Value |
|---|---|
| Hard Disk File Location | Select a directory where the drive should be stored |
| Hard Disk File Size | See the documentation of the individual OS Version.Generally recommended: Minimum of 32 GB |
| Hard Disk File Type | Default selection of "VDI (VirtualBox Disk Image)" |
- Click on "Finish"
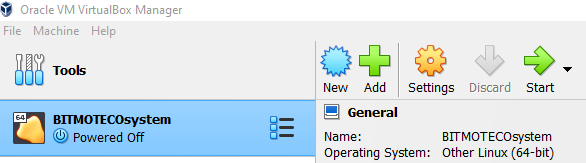
Once you have created your virtual machine, select it from the list of available machines in the VirtualBox Manager under "Tools" and click on the "Settings" button.
Open Network Settings Tab:
See VirtualBox Documentation for a list of available Network Modes with explanations https://www.virtualbox.org/manual/ch06.html#networkingmodes
Example Settings:
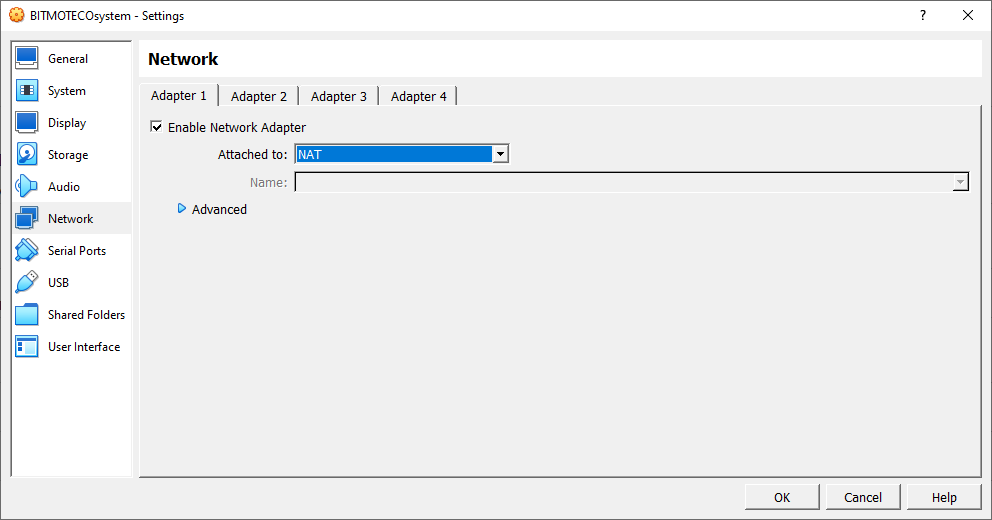
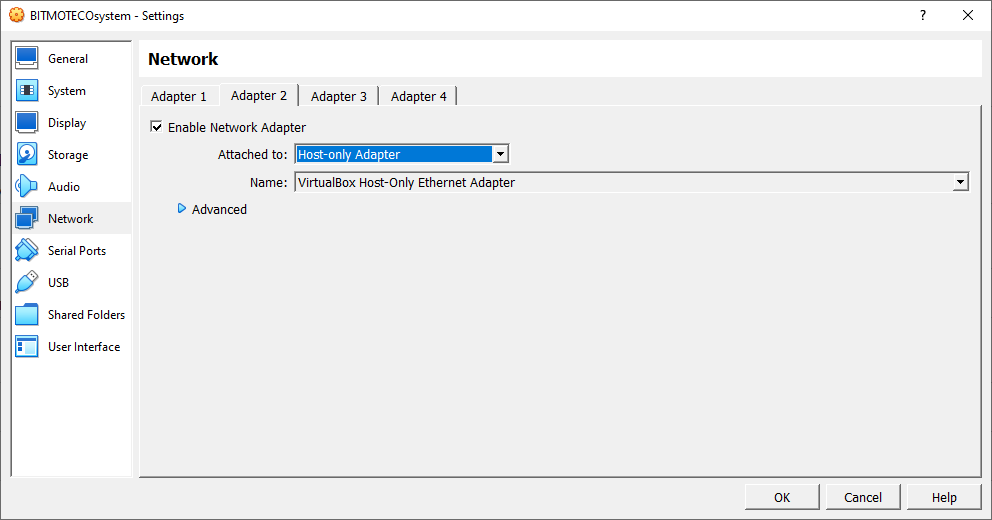
Important Notice: Make sure to choose and configure the right Network Mode settings for your use case. With this settings you can control for example if the VM is accessible over the Network or only accessible on your local machine. It is also possible to configure whether or not the VM can access the Internet.
Click "OK" to save your settings and exit the "Settings" window.
Installation steps
Start your virtual machine and allow it to boot from the ISO image. Follow the instructions provided within the operating system installer to complete the installation process.
Post Installation steps
- Remove the ISO image (Disk)
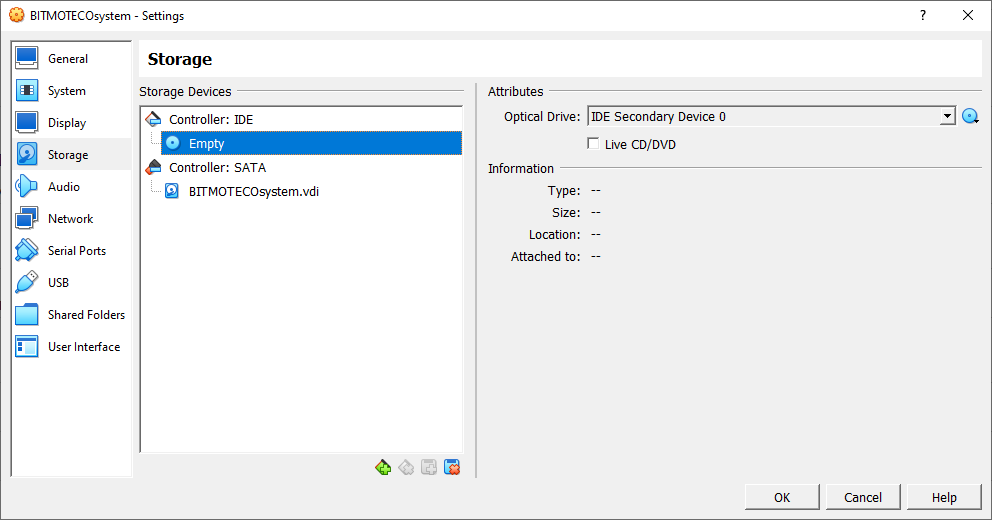
- Open the VM settings Tab "Storage" and select the ISO under the IDE controller.
- Click on the blue disk icon next to the "Optical Drive" dropdown and click on "Remove Disk from Virtual Drive".
- The result should look like the screenshot.
-
Click "OK" to save your settings and exit the "Settings" window.
-
Configure host-only adapter to access the VM from you local system (Windows)
-
Select the adapter ‘VirtualBox Host-Only Ethernet Adapter’ under Windows Network Settings -> Adapter Options
- Open its Properties -> Internet Protocol, Version 4 (TCP/IPv4) -> Properties
- Set the IPv4 address and subnet mask manually:
- IP address: 10.1.1.2
- Subnet mask: 255.255.255.0
- The remaining fields can be left blank
Starting BITMOTECOsystem Virtual Machine
Start the BITMOTECOsystem virtual machine and wait until the system is fully loaded.
You can now open your Webbrowser and open https://10.1.1.1 to access the web-based user interface.
Installation guide for Proxmox VE
Our support team will help you with the setup and installation of your virtual machine using Proxmox VE. If you encounter any issues or prefer guided assistance, we are available to walk you through each step of the process.
To receive personalized support, please schedule a virtual meeting with our team at your convenience. During this session, we will work with you to ensure your virtual machine is configured correctly and ready to use.
To book a meeting, simply contact our support team, and we’ll arrange a time that works best for you. We look forward to assisting you!
Installation guide for Virtual Machine Manager
In this guide, we will walk you through the steps required to create a virtual machine (VM) using the graphical frontend Virtual Machine Manager for QEMU on a Linux based machine. This guide was created using Virtual Machine Manager version 4.0 and QEMU version 6.2.0
Prerequisites
- CPU with enabled virtualization support
- Virtual Machine Manager (virt-manager) installed on your system
- The BITMOTECOsystem ISO image that you wish to install on the virtual machine stored on the same system
Installation video
Installation guide for other hypervisors
Please enable EFI support, provide at least one Ethernet interface and read our system requirements document.
To receive personalized support, please schedule a virtual meeting with our team at your convenience. To book a meeting, simply contact our support team, and we’ll arrange a time that works best for you. We look forward to assisting you!